Blinking Light With Arduino
Level: Beginner
Age group: 9+
Estimated time: 30–45 minutes
Learning Goal
In this activity, you will learn how to make an LED (Light Emitting Diode) blink using an Arduino Uno board. This is often called the “Hello World” of Arduino projects. It’s the first step to understanding how to control electronic components using code!
What You will Need
| Item | Quantity | Description |
|---|---|---|
| Arduino Uno board | 1 | The main microcontroller board |
| USB cable | 1 | Connects Arduino to your computer |
| Breadboard | 1 | Used to build circuits without soldering |
| LED | 1 | Any color works |
| 220Ω resistor | 1 | Protects the LED from too much current |
| Jumper wires | 3 | For making electrical connections |
Step 1: Understand the Circuit
An LED has two legs:

- Long leg (Anode) → Connects to positive (pin 13 on Arduino)
- Short leg (Cathode) → Connects to ground (GND)
Circuit Connections
- Place the LED on the breadboard.
- Connect the short leg (–) of the LED to the GND pin on the Arduino using a jumper wire.
- Connect the long leg (+) of the LED to one end of the 220Ω resistor.
- Connect the other end of the resistor to digital pin 13 on the Arduino.
Tip: Pin 13 is special because the Arduino Uno already has a small built-in LED on it. You can test your code using either the built-in LED or an external LED.
Circuit Diagram (With Breadboard)
You can choose to work with or without a breadboard, whichever you prefer.

Circuit Diagram (Without Breadboard)
Circuit without Breadboard
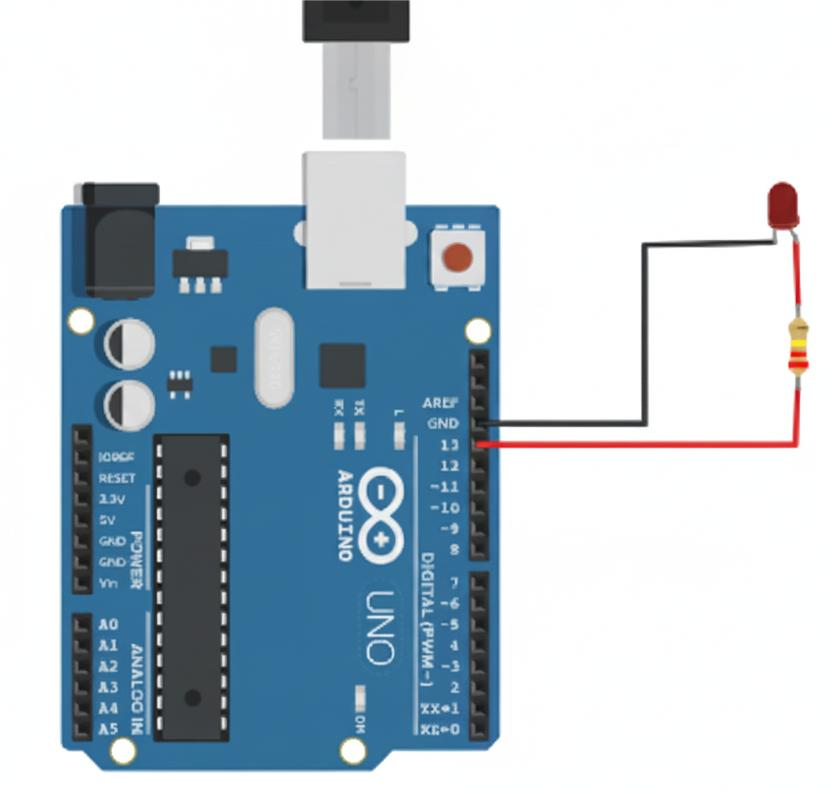
Diagram Description
- The LED’s long leg is connected to pin 13 through the resistor.
- The short leg goes directly to GND.
- USB cable connects the Arduino to the computer for power and uploading the code.
Still having trouble with Circuits?
Here is a step by step guide…
 Connect the short leg (–) of the LED to the GND pin on the Arduino using a jumper wire.


Step 2: Write the Code
Open the Arduino IDE on your computer and type this code:
// Blinking Light Example
// Turns the LED on and off repeatedly

void setup() {
  // Set pin 13 as an OUTPUT pin
  pinMode(13, OUTPUT);
}

void loop() {
  digitalWrite(13, HIGH);  // Turn the LED ON
  delay(1000);             // Wait 1 second (1000 milliseconds)
  digitalWrite(13, LOW);   // Turn the LED OFF
  delay(1000);             // Wait 1 second
}
Step 3: Understand the Code
| Line | Explanation |
|---|---|
void setup() | Runs once when the Arduino starts. We use it to set up pin modes. |
pinMode(13, OUTPUT); | Tells Arduino that pin 13 will send electricity, not receive it. |
void loop() | Repeats forever — this is where your program runs continuously. |
digitalWrite(13, HIGH); | Turns the LED ON (HIGH means electricity flows). |
delay(1000); | Waits for 1 second before moving to the next command. |
digitalWrite(13, LOW); | Turns the LED OFF (LOW stops electricity). |
Another delay(1000); | Waits 1 second again before repeating. |
Fun Fact:
Changing the delay values changes how fast your LED blinks!
Try delay(200); for a faster blink or delay(2000); for a slower one.
Step 4: Upload the Code
- Connect your Arduino Uno to your computer using the USB cable.
- In the Arduino IDE, select:
- Tools → Board → Arduino Uno
- Tools → Port → (Choose your Arduino port)
- Click the Upload button (the right arrow icon).
- Watch your LED blink!
Step 5: Troubleshooting
If the LED doesn’t blink:
- Check your connections — make sure the LED’s long leg is connected to the resistor and pin 13.
- Verify the resistor is in the correct line on the breadboard.
- Make sure you selected the right board and port in the Arduino IDE.
- Try using the built-in LED (pin 13) by removing the external one.
Extra Challenge (For Curiosity!)
Try modifying the code:
- Make a “heartbeat” effect by changing the delay times:
digitalWrite(13, HIGH); delay(200); digitalWrite(13, LOW); delay(100); digitalWrite(13, HIGH); delay(200); digitalWrite(13, LOW); delay(1000); - Use different pins (like pin 7 or 8) — just remember to update the code!
- Add two LEDs blinking alternately (use pin 13 and pin 12).
What You have Learned
✅ How to connect an LED to the Arduino Uno
✅ The difference between digital HIGH and LOW signals
✅ How to use the setup() and loop() functions
✅ How to control timing with the delay() function
Extension Ideas
- Combine LEDs of different colors to make a light show.
- Use a button to control when the LED blinks.
- Create a traffic light system with three LEDs (red, yellow, green).